Tutorial: Get started with Patient Management
In this tutorial, you'll learn about patient registration, booking for appointment, booking for investigation and profile management
Patient Registration
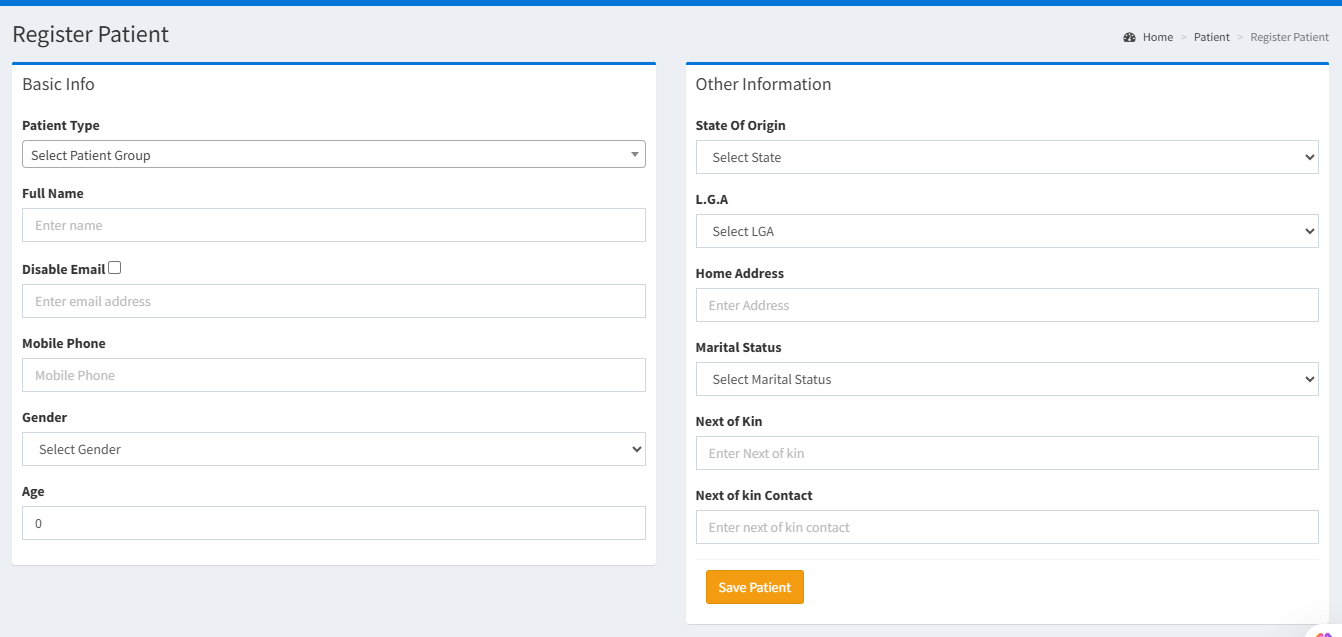
These are the steps to register new patient:
- On the left nav bar locate and click Patient > Register Patient

Edit Patient Info
The Patient Profile section provides comprehensive information about each patient in a well-organized interface. This section allows medical staff to view and manage all patient-related information in one place.
Main Navigation Tabs
The Patient Profile contains several tabs for organizing different types of information:
- Patient Info: Basic patient demographic and contact information
- Appointments: Schedule and history of patient appointments
- Vital Logs: Record of patient's vital signs.
- Test Logs: Laboratory and diagnostic test results
- Investigations: Medical investigations and their findings
- Payment Logs: Financial transactions and billing information
- Statement: Financial statements and summaries
These are the steps to edit patient:
- On the left nav bar locate and click Patient > Patient List
- From patient list, search and select the patient which will open the Patient Profile page
- From patient profile, click on the Action Link at the top right corner, which has the list of possible actions.
Change Email will allow you to change the email address of the patient.
Send Password Link will send a password reset link to the patient email address.

Booking Patient Investigations
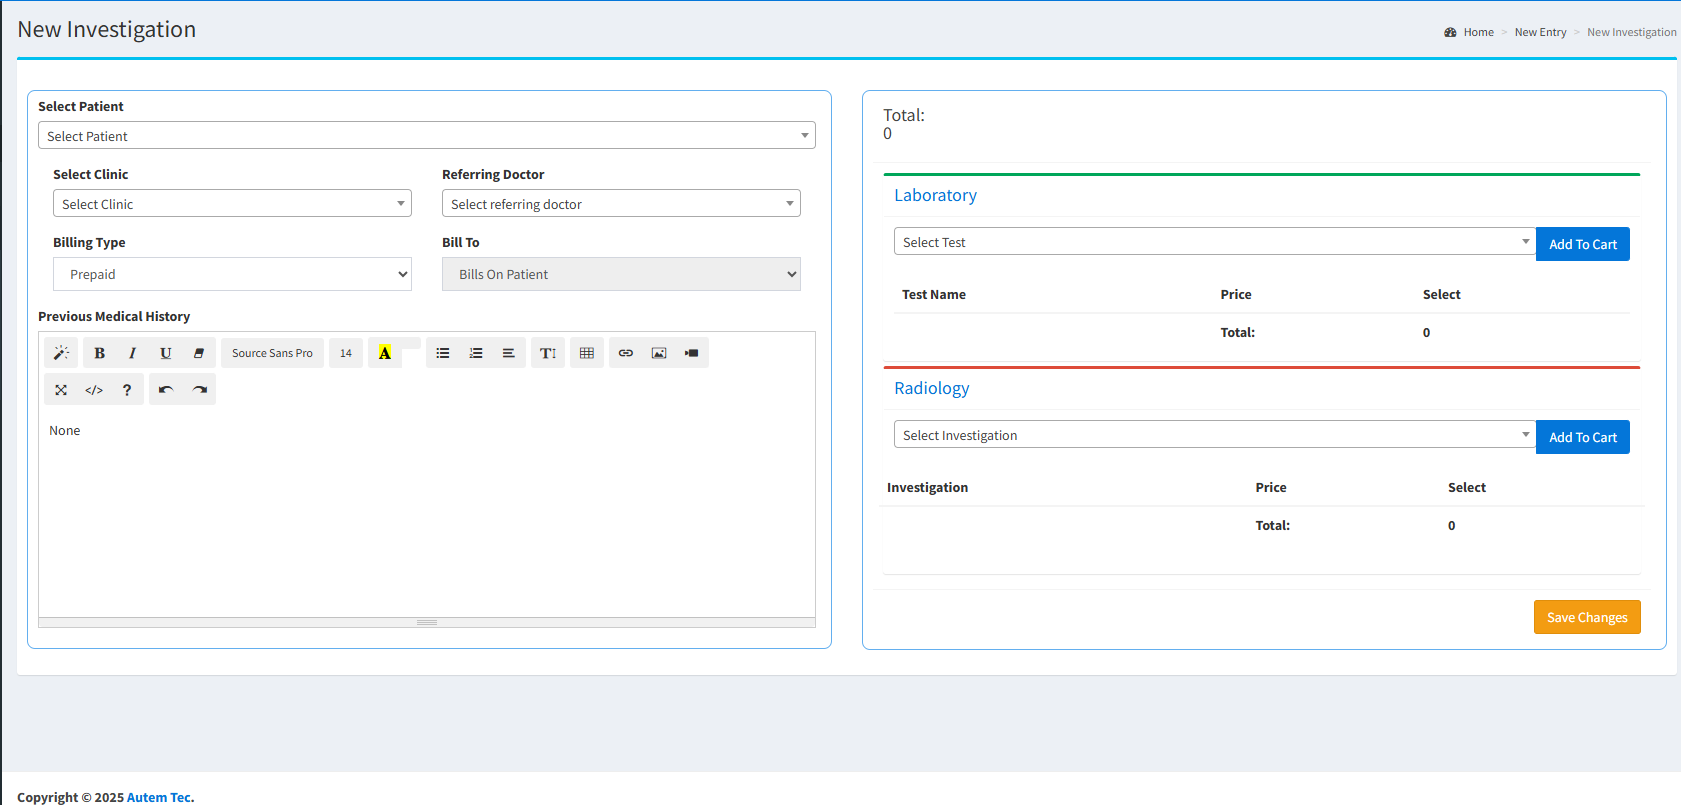
The New Investigation page allows medical staff to order laboratory tests and radiological investigations for patients. This section guides you through the process of selecting a patient, choosing appropriate tests, and completing the booking process.
Accessing the New Investigation Page
- Click on "New Entry" from the main navigation
- Select "New Investigation" from the dropdown menu
- The system will display the New Investigation page as shown below

Patient Selection Section (Left Panel)
- Search for the patient by entering the patient's name in the search box
- Select Clinic: Choose the appropriate referring clinic and doctor for the investigation if any
Billing Information
- Billing Type: Choose the payment method (e.g., Prepaid)
- Bill To: Specify who will be billed for the investigation (e.g., Bills On Patient)
Medical History
- Previous Medical History: Use the text editor to enter or view relevant medical history
- The text editor includes formatting options (bold, italic, underline, etc.)
- You can insert links, images, tables, and other elements as needed
Investigation Selection Section (Right Panel)
Laboratory Tests
- Laboratory: Section for selecting laboratory tests
- Select Test: Click the dropdown to choose from available laboratory tests
- Add To Cart: Click this button to add the selected test to the patient's order
- Test Name: Displays the name of selected tests
- Price: Shows the cost of each test
- Select: Checkbox to confirm selection of tests
- Total: Running total cost of all selected laboratory tests
Radiological Investigations
- Radiology: Section for selecting radiological investigations
- Select Investigation: Click the dropdown to choose from available radiological procedures
- Add To Cart: Click this button to add the selected investigation to the patient's order
- Investigation: Displays the name of selected investigations
- Price: Shows the cost of each investigation
- Select: Checkbox to confirm selection of investigations
- Total: Running total cost of all selected radiological investigations
Grand Total
- Total: Shows the combined cost of all investigations (laboratory and radiology)
- This appears at the top of the right panel
When patient is booked for investigation, depending on the bill type selected, if is prepaid, patient will need to be cleared from account department before investigation can be process
